Are you curious about what Wi-Fi frequency your iPhone uses (2.4GHz or 5GHz)? You’ve come to the right site if you’re unsure how to figure out your Wi-Fi’s GHz on an iPhone.
In this article, we will explain everything you need to know about GHz, from what it exactly is and how to check it on your device. Ultimately, we will also discuss differences Between 2.4 GHz and 5 GHz. Stay connected!
What is Wi-Fi GHz?
The frequency spectrum that Wi-Fi networks use to transmit data wirelessly is referred to as Wi-Fi GHz. It is donated as Gigahertz (GHz), a unit of frequency equal to one billion hertz. There are two main frequency bands in the Wi-Fi worldwide:
2.4 GHz
The older and more popular frequency range for Wi-Fi networks is 2.4 GHz. It has a frequency between 2.400 and 2.4835 gigahertz and works in the 2.4 GHz band. Multiple channels are split into the 2.4 GHz spectrum, typically spaced 5 MHz apart. Wi-Fi routers can often use channels 1 through 11 (or 13 in some nations) of this band.
5 GHz
A more recent and less crowded frequency band for Wi-Fi is 5 GHz. It works in the 5.150 to 5.850 GHz band of the 5 GHz frequency spectrum.
The 5 GHz band provides high-speed data transmission in less busy environments because it has more channels available and suffers from less device interference. It is used for more recent Wi-Fi standards, such as 802.11ac and 802.11ax (Wi-Fi 6).
How to Check Your Wi-Fi GHz on iPhone?
Wi-Fi has become necessary in our connected world. Your internet experience can be significantly impacted by understanding the frequency (GHz) at which your Wi-Fi network works.
You’re in luck if you use an iPhone and are curious about how to check your Wi-Fi GHz. There are various straightforward approaches to find out this important information.
Method 1. Third-Party App-AirPort Utility Wi-Fi Scanner
AirPort Utility app can be used to determine which Wi-Fi frequency band your iPhone is currently using. The app can provide information on various Wi-Fi networks, but it is most useful if you have an Apple AirPort router. To do this:
1. Download the AirPort Utility App
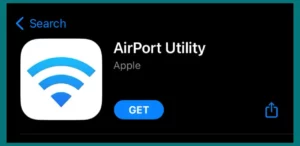
Download the AirPort Utility app to quickly check your connection band if you have an Apple AirPort router. You can use it to learn about Wi-Fi networks, whether you have an AirPort router or not.
If you haven’t already, just download the app from the App Store. Next, press the icon for the AirPort Utility app to open it.
2. Access AirPort Utility
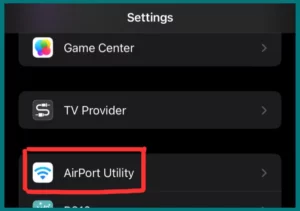
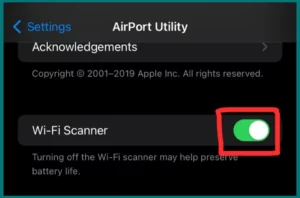
Go to the Settings app on your iPhone. Select AirPort Utility from the list of apps in the Settings menu. This will display the app’s settings menu.
3. Turn on the Wi-Fi Scanner
The toggle switch for “Wi-Fi Scanner” is located in the AirPort Utility Settings menu. Toggle it on, and it will turn green to indicate that the scanner is active.
4. Use Wi-Fi Scan
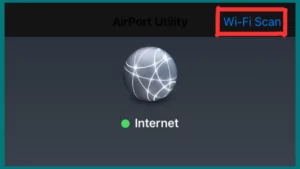
Return to the AirPort Utility app and click the blue “Wi-Fi Scan” link in the top right corner. This will bring up a screen where you can search for neighbouring Wi-Fi networks, regardless of whether they are linked to AirPort routers.
5. Identify the Band
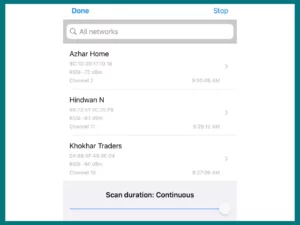
A list of nearby Wi-Fi networks will appear on the screen later. Look at the channel information next to each network to discover whether it uses the 2.4GHz or 5GHz band to function. The 2.4GHz band is represented by channels 1 to 11, and the 5GHz band is represented by channel numbers greater than 11.
For example, A 2.4GHz network would have a channel number of 6, whereas a 5GHz network would have a channel number of 20 or 30, etc.
Things to Consider
- Please be aware that various regions may have different channel numbering. Make sure to check your numbering method before trying out this method.
- If your router has two bands and they both have the same network name, the AirPort Utility app will also show them as two independent networks with the same names.
Method 2. Find the IP Address of Your Wi-Fi Router
Most routers broadcast in two bands of frequencies. You can give each band its own network name or SSID if you want to know which band your iPhone is using.
To achieve this, you must first determine your router’s IP address, which can be done on your iPhone by following these instructions.
1. Access Wi-Fi Settings
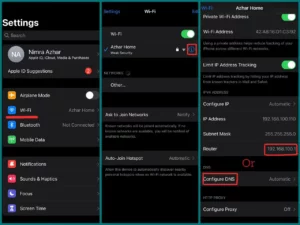
- Go to the Settings menu.
- Select the “Wi-Fi” tab.
- A list of connected and nearby Wi-Fi networks will appear.
- Locate the network name to which you are connected, then press the information icon (i), which is often next to the network name.
- Scrolling down, find the “Router” or “Configure DNS” option. The IP address of your Wi-Fi router can be found here.
2. Enter the IP address in the Browser
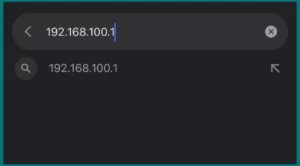
- Copy the IP address you discovered and type it into the search box of your web browser.
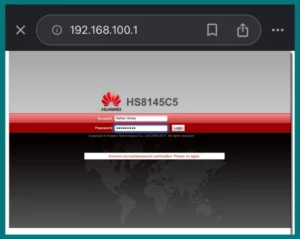
- Click “Enter.” This step lets you get detailed information and modify different network-related settings, including customizing network names and altering signal ranges, on your Wi-Fi router’s web-based configuration page.
3. Access your Router
Enter your router’s username and password and log in on the router’s website. If you are unsure, these login credentials are frequently written on a label attached to your router. The URL for your router login page can also be found on your router.
5. Create SSIDs for the Wi-Fi Bands
Go to the Wi-Fi network settings after logging in. Please be aware that your router model may affect the precise location of this choice because different routers have different user interfaces.
6. Give each Wi-Fi Band a Name
Specify unique names for each Wi-Fi band. For example, you can label the 2.4 GHz band as the “Primary Network” and the 5 GHz frequency as the “Secondary Network.” It will be simpler to identify which band your device is currently connected to due to this naming convention.
Things to Consider
- While using this strategy, you can distinguish between Wi-Fi bands, but it’s important to keep in mind that some devices, such as iPhones and iPads, might not advise providing the bands individual network names.
- Other devices, like Android, allow you to name the bands individually. Separating the names can also make it easier for iOS devices to automatically swap bands, improving their overall performance.
Method 3. Get in Touch with your Internet Service Provider
- If none of the solutions work, contact your ISP’s customer service.
- They should be able to tell you your Wi-Fi network’s frequency information.
Understanding your Wi-Fi network’s GHz frequency is essential since it influences your connection’s performance, speed, and range.
The 5 GHz band offers quicker speeds and less interference across a shorter range, while the 2.4 GHz band is slower but more prone to interference even at longer ranges. This information lets you decide how to tailor your network to suit your unique requirements.
Differences Between 2.4 GHz and 5 GHz
1. Speed: Compared to the 2.4 GHz range, the 5 GHz band typically offers quicker data transfer speeds. Because of this, it is better suited for tasks like streaming, online gaming, and downloading large files.
2. Range: The 2.4 GHz frequency provides better coverage over walls and longer distances. Although the 5 GHz band has a limited coverage area, it can deliver stronger transmissions.
3. Interference: Because more devices (microwaves, cordless phones, and Bluetooth devices) use the 2.4 GHz band, there is a higher risk of interference. Because the 5 GHz spectrum is less crowded, interference is less likely to occur.
4. Support for Older Devices: Some older devices may only support the 2.4 GHz band. Newer devices usually support both bands. A better experience may be had by using the 5 GHz band if a device can do so.
5. Concurrent Connections: The 5 GHz band allows for more concurrent connections without slowing down, making it appropriate for homes with numerous devices.
Can You Manually Change Between 2.4GHz and 5GHz Wi-Fi Bands on iPhone?
A manual option to switch between the 2.4 GHz and 5 GHz Wi-Fi bands is often unavailable on iPhones. The Wi-Fi hardware and software of the device normally make this choice automatically based on signal strength and other aspects to deliver an ideal connection.
However, iOS devices are made to intelligently choose the best Wi-Fi band based on the capabilities of your device and the network environment.
For example, your iPhone will frequently connect to the 5 GHz band for better speeds if you’re close to the network and both the 2.4 GHz and 5 GHz bands are accessible. The router can change back to the 2.4 GHz band for a greater range if you travel further away from it and the 5 GHz signal.
Reasons to Switch Between 2.4 GHz and 5 GHz
- Speed: Faster data throughput at 5 GHz makes it ideal for gaming and streaming.
- Congestion: Due to various devices, 2.4 GHz might be crowded, whereas 5 GHz is less crowded.
- Range: 2.4 GHz offers improved coverage in bigger areas.
- Compatibility: While newer devices can handle both bands, older ones sometimes only support 2.4 GHz.
- Interference: Devices like microwaves can cause interference at 2.4 GHz, which degrades the quality of the transmission.
- Multiple Connections: 5 GHz enables additional connections while maintaining speed.
- Signal Strength: Depending on where you are, one band may have a stronger signal than the other.
- Home Automation: Some smart home appliances perform better on 2.4 GHz, necessitating the need for a band switch.
Conclusion
It is essential to understand the difference between 2.4 and 5 GHz connection in the world of ever-changing Wi-Fi connectivity. Although iPhones often don’t support direct manual switching, speed, range, and interference determine the decision between these bands. Ultimately, customizing your connectivity approach to your requirements will provide an enhanced online experience.

