Are you wondering how you can delete photo albums from your iPhone? To keep your device organized and clear up space, you must learn to manage your photo collection effectively.
In this article, we’ll go over how to easily delete unwanted photo albums, which will help you keep your iPhone tidy and clutter-free.
What Happens when You Delete a Photo Album on Your iPhone?
The following occurs on your iPhone when you remove a photo album:
- The album will no longer be visible in your list of albums after it has been deleted from your Photos app.
- The pictures in the deleted album are still in your Camera Roll or other albums; they haven’t been removed from your device.
- Depending on how they were arranged, any images in the deleted album will be transferred to your primary Camera Roll or other albums that are currently in existence.
- Only the arrangement of the images will change when an album is deleted; no actual photos are lost.
How to Delete Photo Albums from Your iPhone?
Here is an easy and most effective technique to delete photo albums from your iPhone, which works on all new and old models of iPhone.
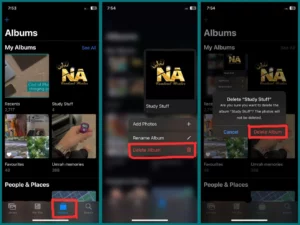
- Launch the iPhone app “Photos.”
- Press the “Albums” button at the bottom of the display.
- Locate the album you wish to remove, then tap to make it accessible.
- Press the triplets (•••) located in the upper right corner.
- Choose “Delete Album” from the list of choices.
- Verify the removal by selecting “Delete Album.”
By using this simple and easy technique, you can get rid of unnecessary photo albums on your iPhone and improve photo organization.
Important Considerations Before Deleting Albums
Before removing photo albums from your iPhone, consider these crucial elements:
Make a Photo Backup: Ensure you have a current backup of your images. Errors may occur, and you don’t want to waste priceless moments. Make use of iTunes, iCloud, or another backup solution.
Shared Albums: Removing an album from a shared collection may impact the access of those who have accessed it. Talk to them before taking them out.
Duplicates: Photographs in the album may be duplicates of images in your Camera Roll or other albums. Make sure to check for this. Photos remain in the album even after it is deleted, and duplicates could clog your library.
Organizing photographs: Consider the arrangement you’d like to use for your deleted photographs. Make sure you have a layout in mind for the photos.
Privacy: Sensitive or private material may be included in certain albums. Before deleting, make sure they are well protected or backed up.
By keeping these things in mind, you may efficiently manage your photo albums and stay clear of possible problems.
How Can You Bulk Delete Albums from Your iPhone?
The following technique can be used to remove albums from your iPhone in bulk:
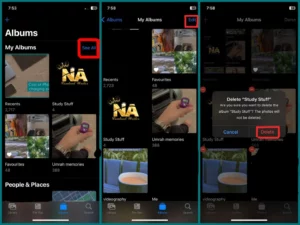
- Launch the iPhone app “Photos.”
- Select “Albums” from the screen’s bottom menu.
- Locate the “My Albums” area under the “Albums” menu.
- To see every one of your albums, tap “See All.”
- Click “Edit.” in the upper right corner.
- After selecting “Edit,” you can select several albums to remove by tapping them.
- Tap Delete after choosing the albums.
- Click “Delete Album” to confirm the deletion in the pop-up dialogue.
This method makes managing the photo library on your iPhone more effective by allowing you to remove many albums at once.
Conclusion
To sum up, organizing and optimizing storage on your iPhone requires that you manage photo albums. When deleting albums, whether one by one or in bulk, it’s crucial to take backups, shared information, duplication, and privacy issues into account. You can keep your photo library on your device safe, orderly, and well-organized with a little forward forethought.


