
Are you wondering how much time can an iPhone screen record? The ability to record and share what is happening on your iPhone screen has become increasingly important in the digital era.
You can record your screen to make tutorials, share gameplay, or simply capture significant events. But is there a time limit on how long an iPhone may capture your screen? This article will explain the specifics of screen recording on an Apple device and identify potential restrictions.
Can You Record Screen Recordings Longer on an iPhone?
On your iPhone, you can indeed record for longer periods. On previous iOS versions, there used to be a time limit for screen recordings. However, newer updates have increased this limit.
You are not bound by any time restrictions when recording, as you can record for as long as your iPhone model and storage allow. With this versatility, users can record lengthy videos for various uses, such as in-depth instruction, lengthy gameplay sessions, and more.
How Long Can You Screen Record?
On iPhone
An iPhone’s built-in capacity to record screen activity for a prolonged period of time gives users the option to record lengthy amounts of their device’s screen activity without artificial time restrictions.
This limitless potential gives people the freedom to capture any uninterrupted content, including lengthy events, in-depth courses, extended gaming sessions, and other types of information.
Although there is the potential for an infinite duration, to guarantee a smooth and uninterrupted screen recording experience, factors like battery life, storage space, app restrictions, screen timeout settings, background apps, device overheating, and iOS updates must be considered.
On iPad
Like how screen recording on an iPad a limitless duration potential has, it enables users to record longer chunks of their device’s screen activity without arbitrary time restrictions.
This adaptable feature enables people to produce in-depth lectures, record protracted presentations, or record extensive gaming sessions. However, like iPhones, some variables can affect how well an iPad records.
How to Screen Record on An iPhone?
You can record the screen on the iPhone using the built-in default capability and third-party apps. This is how you do it.
Using the Default Screen Recording Feature
1. Enable Screen Recording
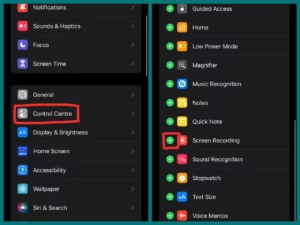
First, ensure the Screen Recording feature is accessible in your Control Centre before enabling it. To accomplish this, navigate to “Settings” > “Control Centre” > “Customize Controls,” then, if it isn’t already present, add “Screen Recording” to your Control Centre.
2. Access Control Center
To reach the Control Centre, swipe down from the upper-right corner of your iPhone (or, depending on the model, swipe up from the bottom).
3. Start recording
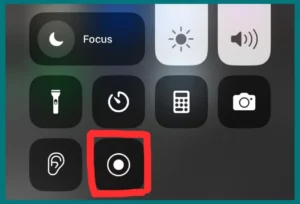
The “Screen Recording” symbol (a circle with a white dot inside) can be found in the Control Centre. Select this icon.
4. Confirmation
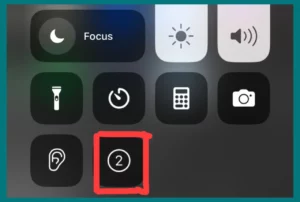
You will see a countdown meter with a few seconds to set up your screen. Your iPhone will begin recording everything that appears on the screen after the countdown, including your taps and interactions.
5. Stop Recording
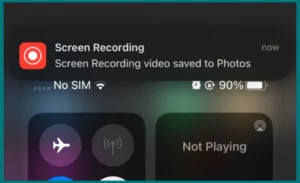
To stop recording, either go back to the Control Centre and hit the “Screen Recording” icon once more or tap the red status bar at the top of your screen. You’ll get a notification when your screen recording is saved to your Photos app.
Using Third-Party Apps
The App Store has many different third-party screen recording applications, each with special features. Using an external app
1. Download and Install
Download and install the desired screen recording app by visiting the App Store. Download and set up the application.
2. Read the App’s Instructions
Open the app, then follow its unique screen recording instructions. You might need to change the settings or grant permissions for some applications.
3. Start Recording
You often need to press a record button inside the app to begin screen recording.
4. Stop Recording
Use the app’s suggested method to stop recording, which could involve touching a stop button or making a stop gesture.
5. Save or Share
Once you’ve completed recording, the app normally allows you to keep the recording to your device or immediately share it.
It’s important to follow the instructions and look through the available features of each third-party software because they could have slightly different features and methods.
Ultimately, screen recording is possible on the iPhone through the built-in Screen Recording capability and third-party screen recording apps downloadable from the App Store. Your own demands and tastes will determine the strategy you choose.
Conclusion
In the world of technology, you can screen record on an iPhone for unlimited time. Screen recording on iPhones and iPads provides a wide range of capabilities, whether through the built-in feature by default or third-party apps.
Third-party apps offer more flexibility and capabilities, while the default feature is simple and practical. Whatever technique you use, a seamless screen recording experience is guaranteed by being aware of device limits and optimizing settings.